Hey guys! Here’s a little black smokey eye tutorial for hooded eyes! I’ll walk you through this look step-by-step, with pictures of each step, to help you guys create this smokey eye makeup look on your own.
Follow me on TikTok: @Debra_Jenn
Table of Contents:
- Intro to Doing a Smokey Eye with Hooded Eyes
- Smokey Eye Step by Step Tutorial
- My Favorite Smokey Eyeshadow Palette
- Watch My In-Depth Smokey Eye Tutorial Video
See More: Step-By-Step Makeup Tutorials
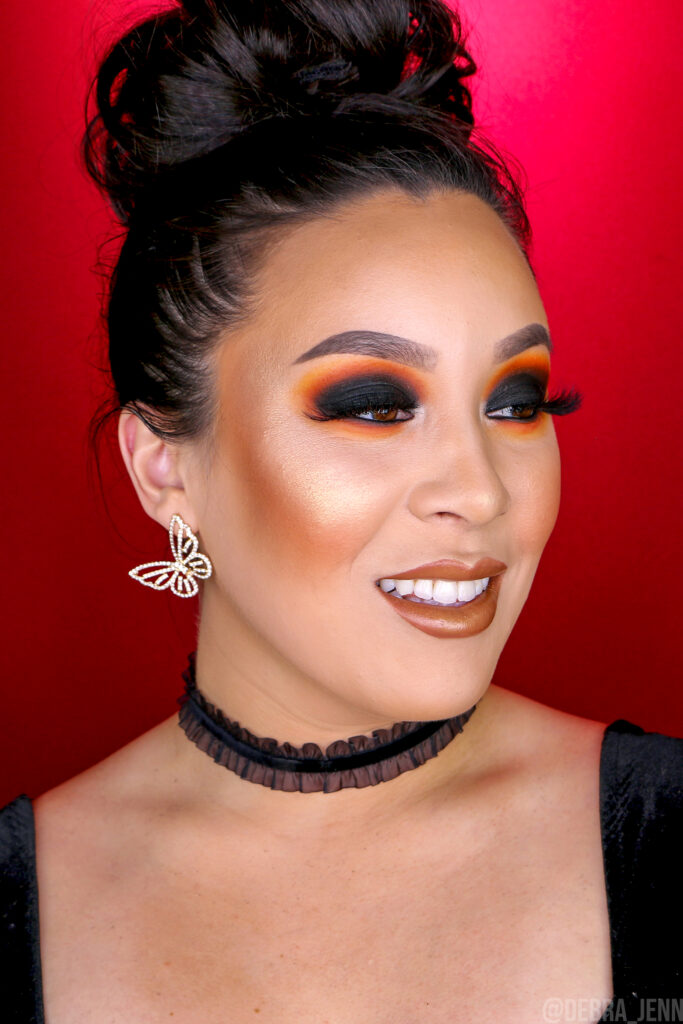
A Smokey Eye for Hooded Eyes? It Can Be Tricky, But You Got This!
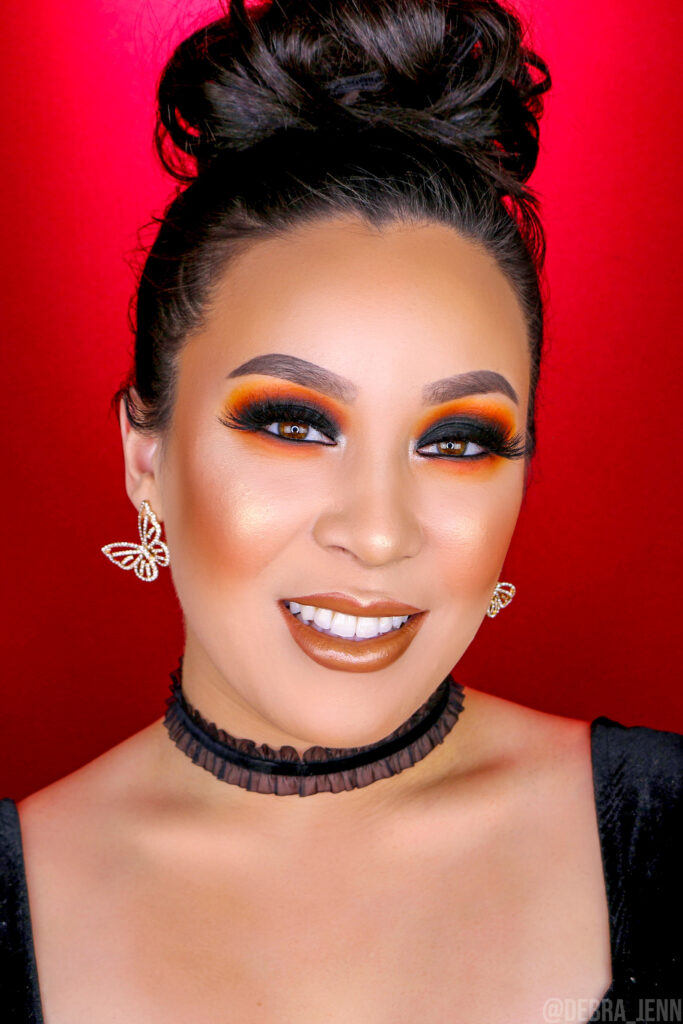
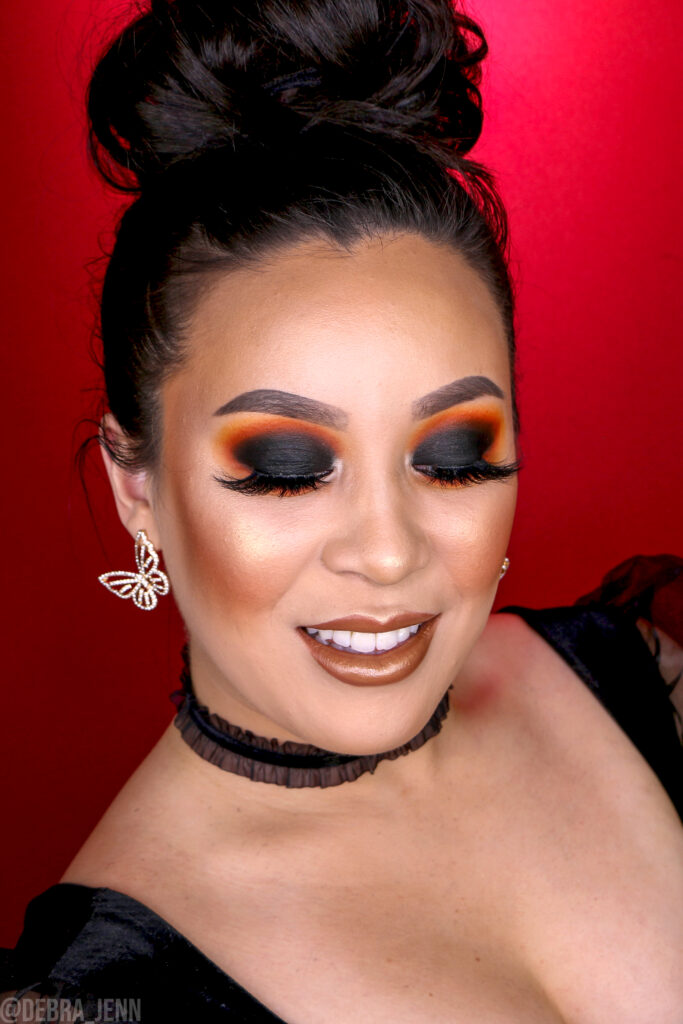
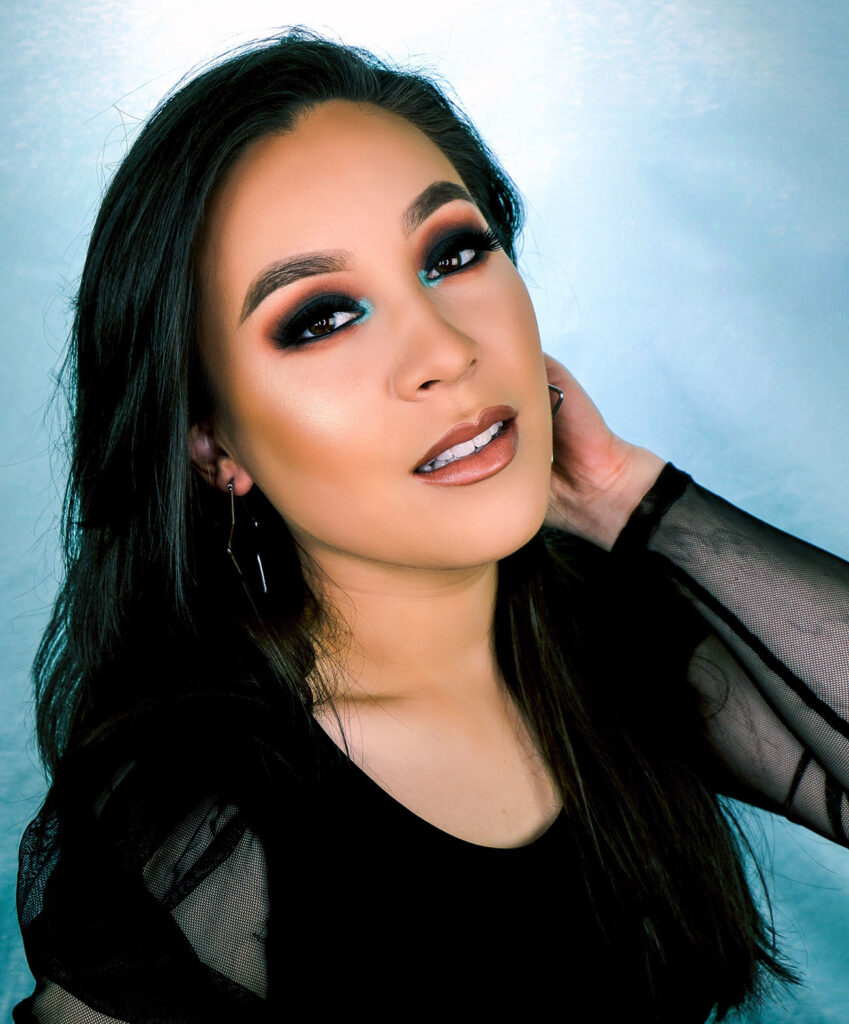
I have slightly hooded eyes, and I know it can be tricky to create a smokey eye (or any eye makeup look) when you don’t have a ton of lid space, but there’s ONE MAIN TRICK that I’ve found that helps me. Are you readyyyyy? Ok, the trick to creating a smokey eye for hooded eyes is to find your crease by using the outline of your eyeball socket as a guide — do not, I REPEAT: DO NOT use your actual crease for placement of your shadows, because that will be too low and using your real crease instead of the outline of your eyeball socket will make your eye look smaller and beadier, while using your eyeball socket to determine where to place your shadows will help to open the eye up and make it look bigger… even when using lots of dark shadows, like we did for this black smokey eye.
For my original smokey eye look (the one with the turquoise in the inner corner), I used a handful of single pan shadows from MAC Cosmetics and Makeup Geek. My sister says all my single pan shadows are all the same color… BUT SHE IS WRONG. I may have a lot of shades of brown in my single pan collection, BUT THEY ALL HAVE DIFFERENT UNDERTONES, so they were all highly necessary purchases! Anyone with me on this?
In the updated look with the orange tones (video tutorial at the end), I used the OG Jaclyn Hill x Morphe palette, which is still one of my all-time faves.
Follow me on Instagram: @debra_jenn

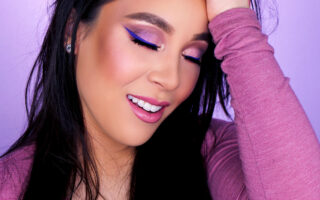
I wanted to add a pop of bright color to the inner corner to add a little something fun to the look that’s otherwise just about as dark as my heart. So I popped on the turquoise color from The Zulu Palette by Juvia’s Place in my inner corner, but you can really use any color you want, since this look is technically a neutral look (I know, I know, when most people think of neutral looks, they think of light nude tones, but I’m an extra-ass clown lady and I like to go all out for most of my makeup looks, so this is my neutral, okay? Ok, but seriously, on a daily basis, I go for a very neutral makeup look (TBH I wear zero makeup most days, but who’s checking?), but I love creating more fun looks on Instagram and YouTube, so since that’s what my heart wants, that’s what my heart SHALL GET.
Ok, I feel like I’m really going off on a tangent now, and even I have no real idea what I’m talking about, so let’s just get into breaking this black smokey eye down step by step, SHALL WE? Hey, do any of you guys remember that TGIF show, Step By Step? Because now that’s in my head… ok, ok, enough chit chat, let’s gooooo!
Step by Step Smokey Eye Tutorial
If you like my tutorial, please pin the look and follow me on Pinterest!
Smokey Eye Step 1: Prepping the Eye
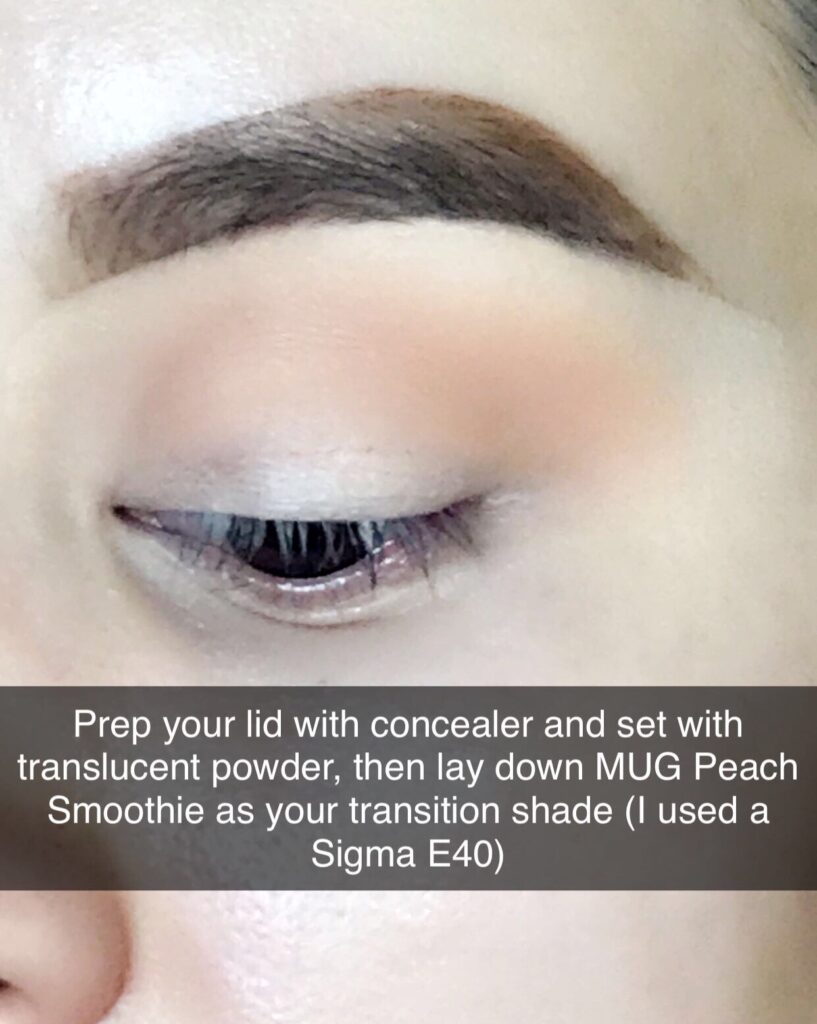
Prep your lid with your favorite concealer and set the concealer with translucent powder. For this look, I prepped my lid with Tarte Shape Tape in light and set with RCMA No Color Powder.
Then lay down Makeup Geek’s single pan shadow in Peach Smoothie as your transition shade, using a Sigma E40 blending brush (you can use my Sigma discount code DEBRAJENN to save money on sigmabeauty.com)
Now that Makeup Geek is no more (RIP), ABH Orange Soda is the perfect dupe to use for this step.
Products Used:
Step 2: Build Your Crease
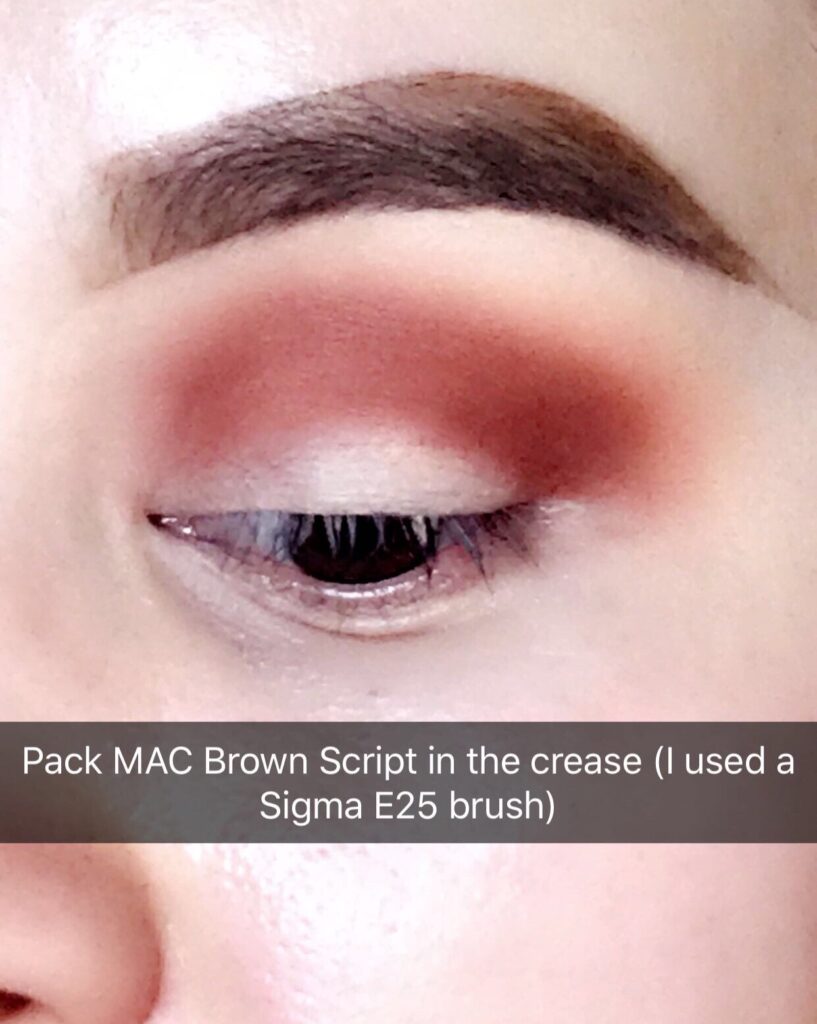
It’s time to build some dimension in your crease! To do that, pack MAC Brown Script in the crease using a Sigma E25 blending brush.
Products Used:

Step 3: Diffuse!
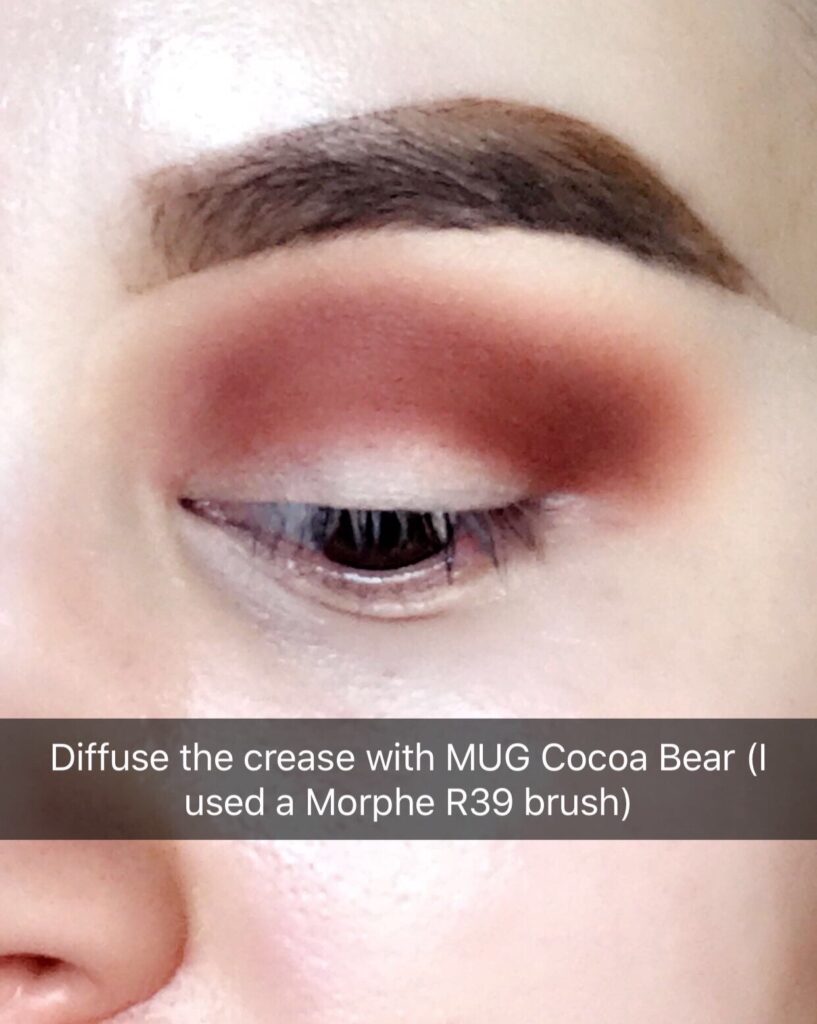
Diffuse the crease color with Makeup Geek Cocoa Bear using a Morphe R39 brush (which is just a slightly fluffier version of the Sigma E25).
A great dupe for MUG Coca Bear is ABH Blazing.
Products Used:
Step 4: Bring on the Black
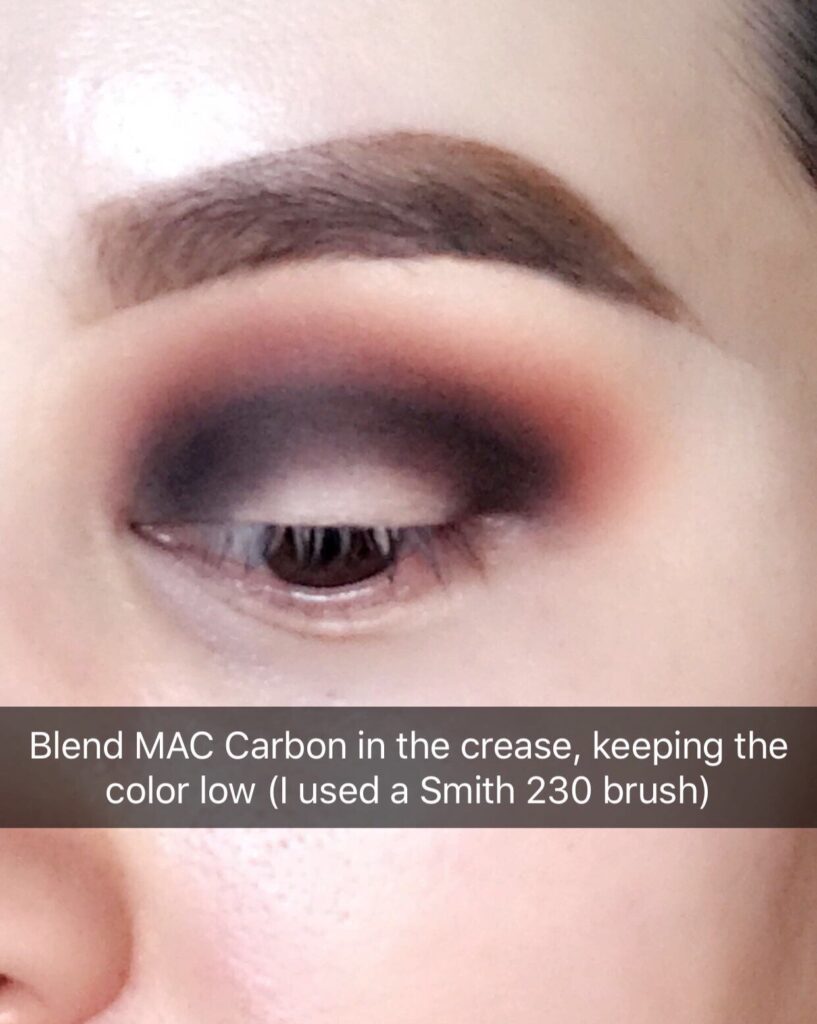
Blend MAC Carbon in the crease using a Smith 230 brush, keeping the color low, since this is very DARK black shadow.
Products Used:
Step 5: Black Eyeshadow Base
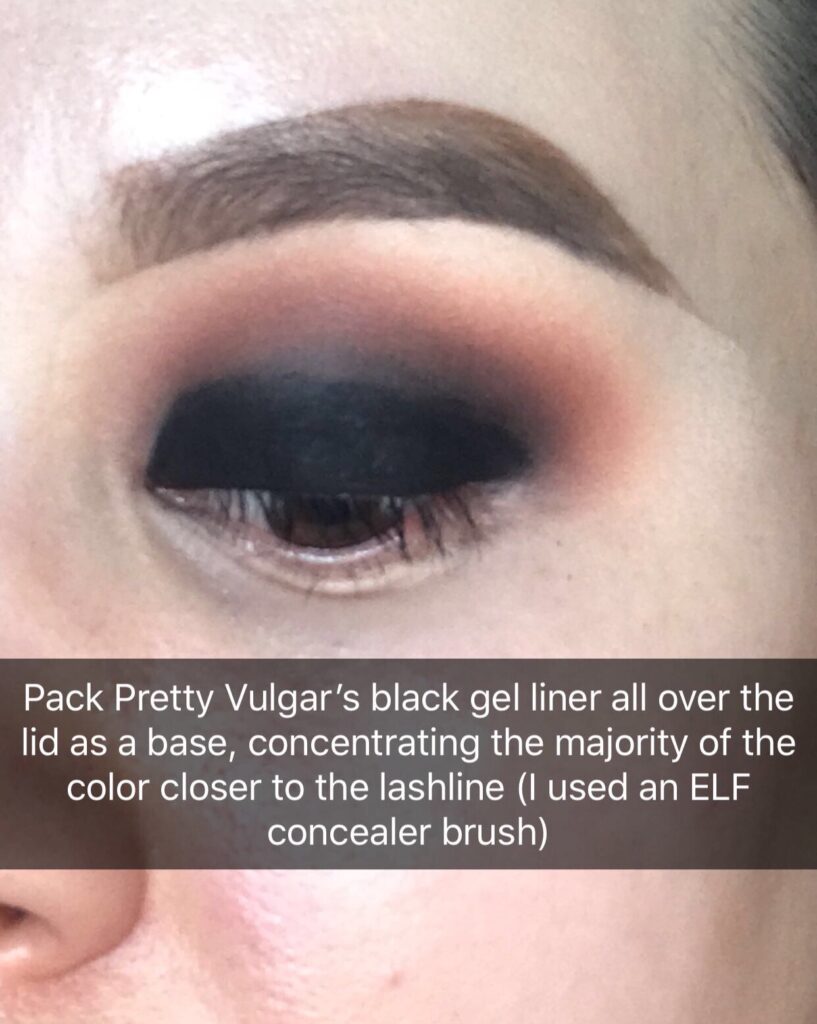
I packed Pretty Vulgar’s black gel liner all over the lid as a black eyeshadow base, concentrating most of the color close to the lashline, since you want the darkest color to be at the dashline, and just feather the rest of the product out, towards the crease. For this step, I used an ELF concealer brush.
Now when I do this look, I prefer to use a true black eyeshadow base (it’s usually a bit easier to spread on the eye), but ABH Waterproof Creme Color is my current favorite gel liner and would work great for this step!
Hooded Eye Tip: For people with hooded eyes, like myself, you can find the proper “crease” placement on your eye by using the outline of your eyeball socket as a guide.
Step 6: Set the Black Base
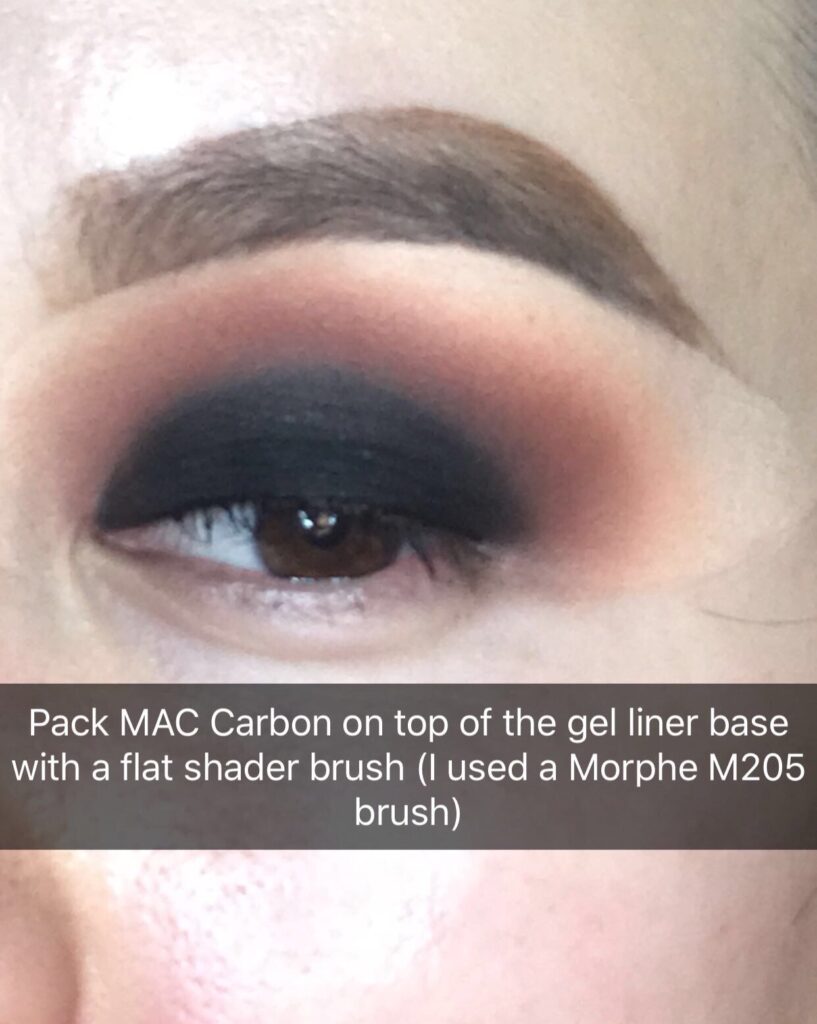
Pack MAC Carbon single eyeshadow on top of the black gel liner we’re using as our eyeshadow base with a flat shader brush. I used the Morphe M205 brush for this step because it’s a nice, compact flat shader and won’t get the black shadow anywhere we don’t want it to get.
Step 7: It’s Lower Lashline Time!
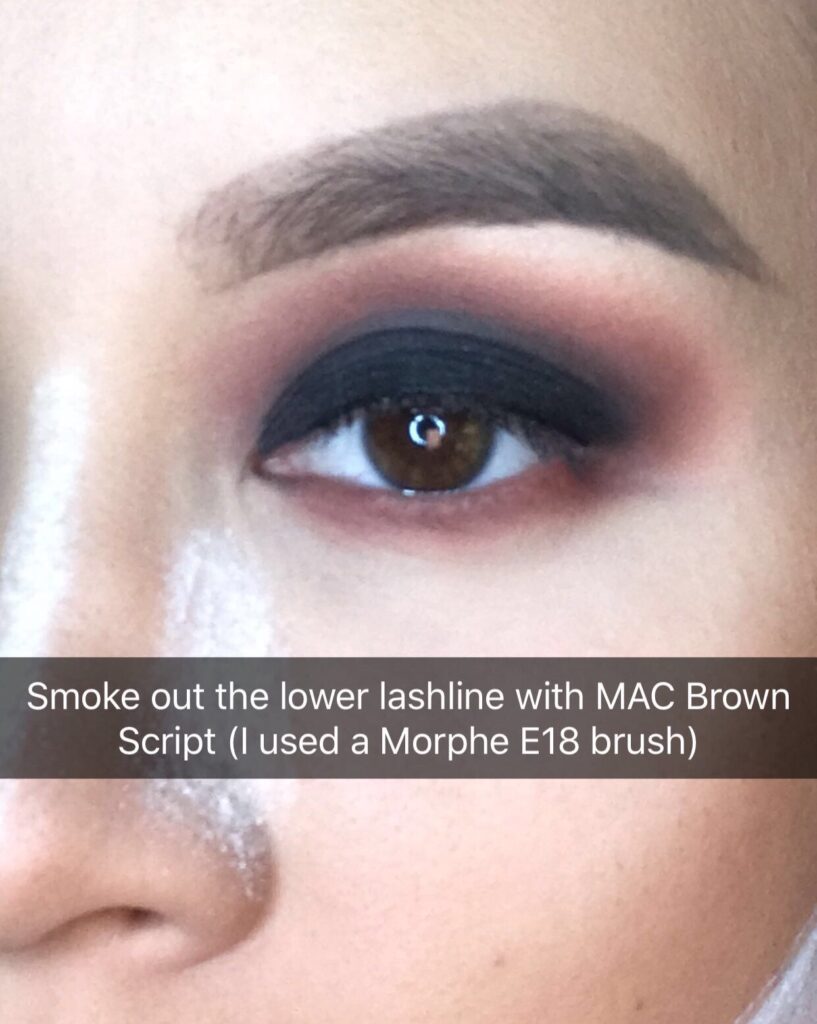
Smoke out the lower lashline using MAC Brown Script on a Morphe E18 brush. Dont be afraid of smoking this color out low, since the look is smokey, it’ll really bring the whole look together. TBH, I think I probably could’ve smoked this color out a little lower, but my sister was waiting for me to finish getting ready, so I felt RUSHED lol.
Step 8: More Black Eyeshadow!
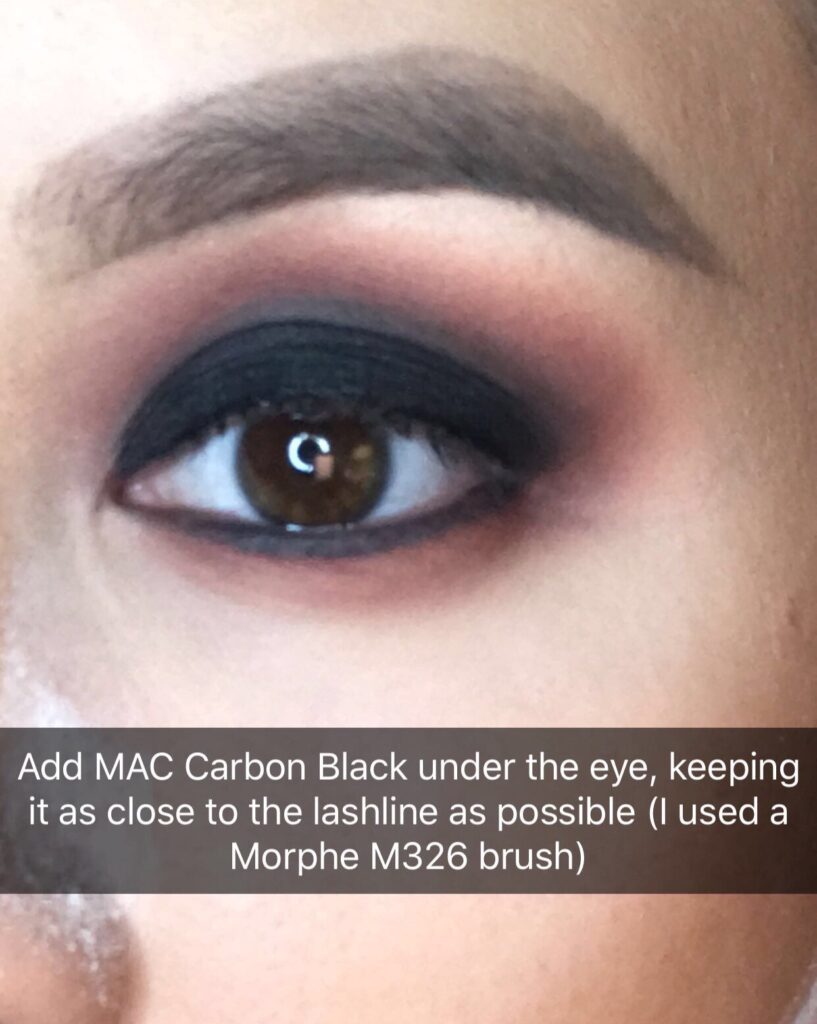
Add MAC Carbon black eyeshadow under the eye using a Morphe M326 brush, keeping it as CLOSE to the lashline as you can. Since this is the darkest color, we don’t want to get too crazy with it, or you’ll risk looking like a raccoon!
Step 9: The Inner Corner
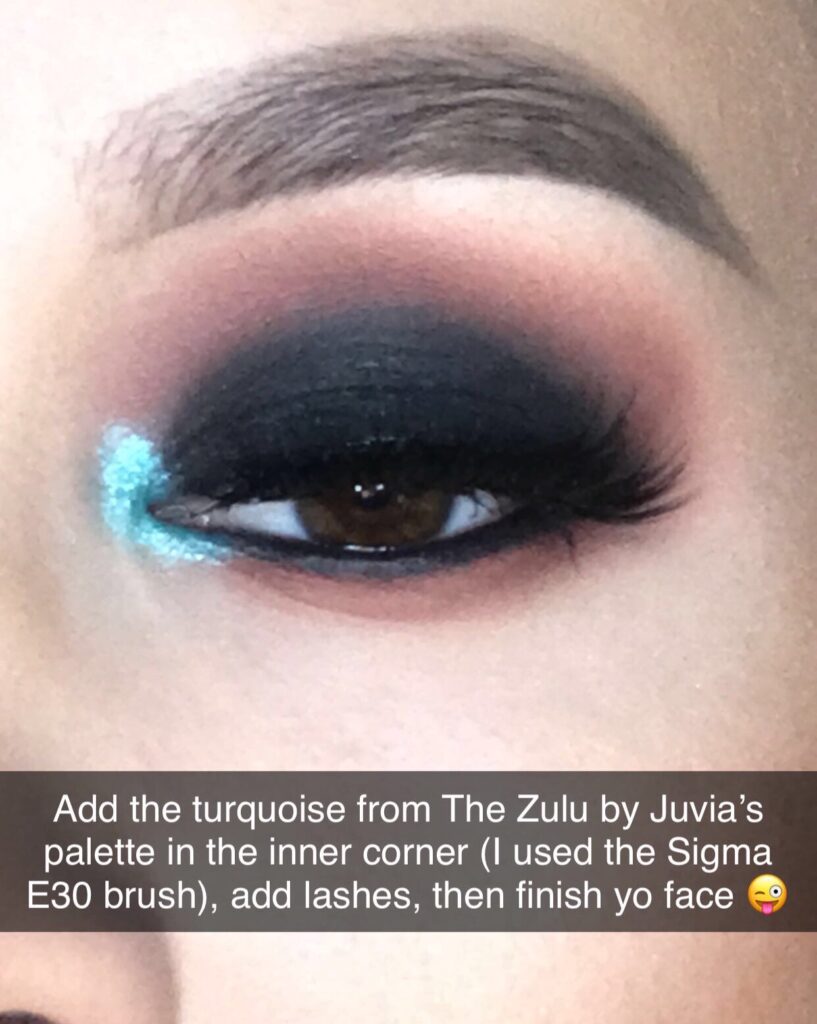
Add a pop of color to the inner corner for some pizzazz! I used the turquoise shimmer shade from The Zulu palette by Juvia’s Place, but you can really use whatever color floats your boat with this look, since the rest of the look is so neutral (dark and smokey, yes, but still neutral).
To top it all off, add lashes! I used the most thick, dramatic pair I own, natch. Since this look is so dense, you want a lash that can stand up to the dramaaaa! I used the Velour mink lashes in Fluff’n Thick, but these days, Lilly Lashes makes my fave lashes.
The Final Step: SLAY
This is the kind of look where you def wanna do eyes first, then finish your face with your usual routine! If you want foundation tips, check out my post on my favorite affordable foundation routine.
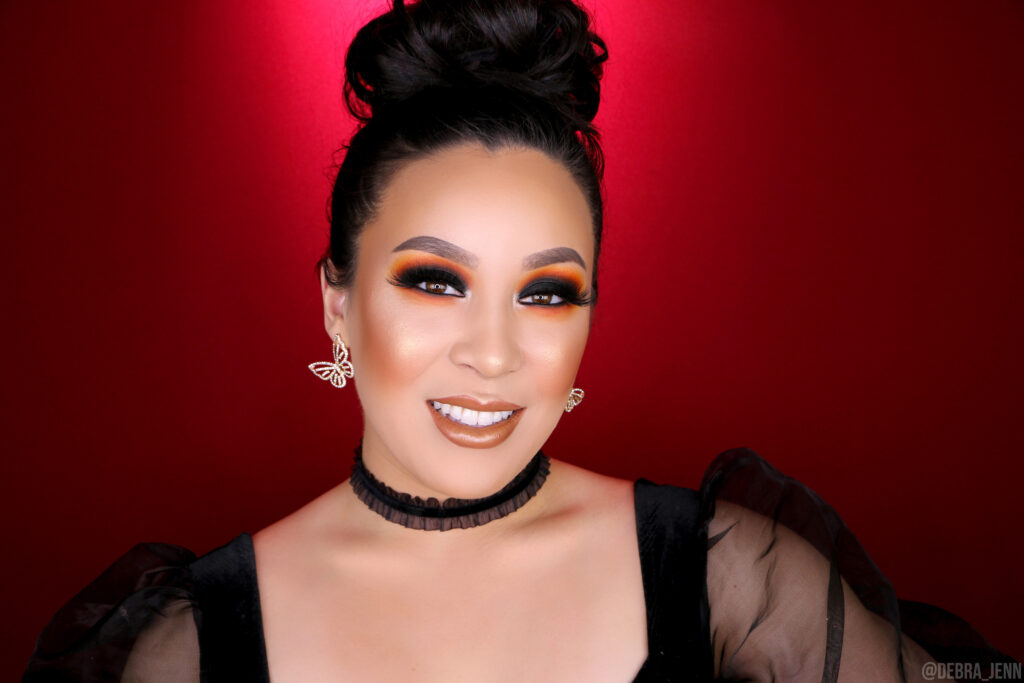
And there you have it, folks, the FINISHED LEWK! I hope you liked this step-by-step black smokey eye tutorial for hooded eyes!
If you liked this tutorial, it would mean the world to me if you pinned it on Pinterest, followed me on Instagram and subscribed to my YouTube channel where I post a lot more makeup tutorials and beauty inspo!
Like my Facebook page for live tutorials: Debra Jenn
My Favorite Smokey Eyeshadow Palette & Other Must-Haves
Shop my Amazon store for my favorite skincare, costumes, home organization & more!
Watch My Black Smokey Eye Tutorial
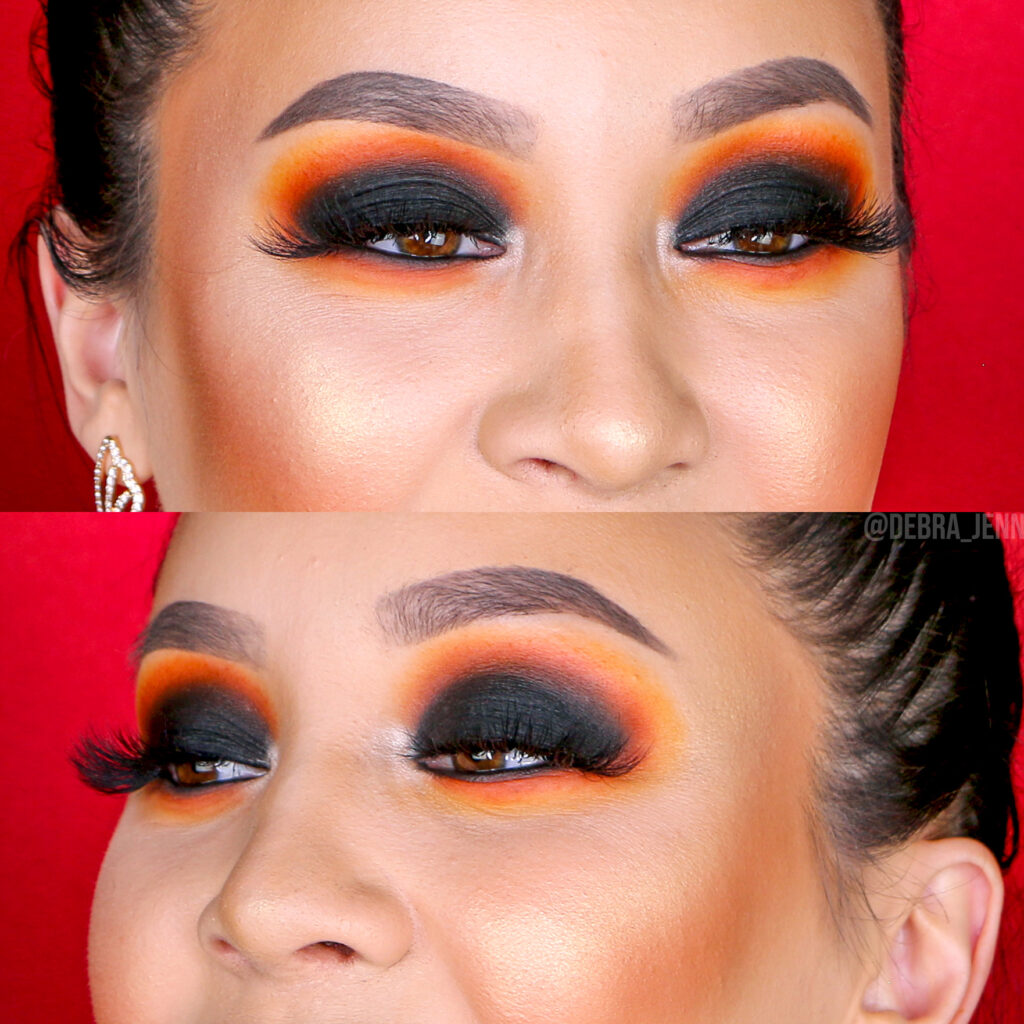
The smokey eye tutorial below is slightly different from the step by step pictures shown above (I used the OG Jaclyn Hill x Morphe palette for the video instead of individual shadows, and I actually like how it came out better!), but the steps are pretty much the exact same. Just goes to show you can apply the same techniques using different colors and products!
Subscribe to my YouTube channel